Digital Input (en)
German Version
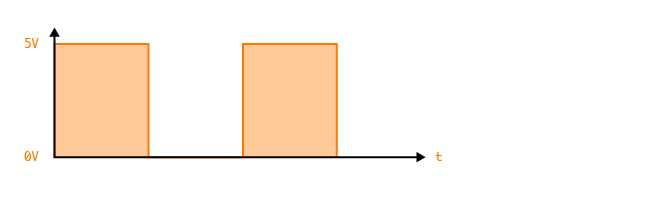
Digital input is something with only two states: ON or OFF. In the case of the Arduino, the ON state corresponds to an electrical voltage of 5V and OFF to a voltage of 0V. On the Arduino, we mainly use the digital PINs (D0-D13) for digital circuits. However, the analogue PINs can also be used as digital pins if more inputs or outputs are required
Functions
The corresponding function for reading is:
digitalRead (PIN);
Reading out the value at the specified PIN
In the following we will read in a button press with the Arduino. There are basically two options, which are illustrated here:
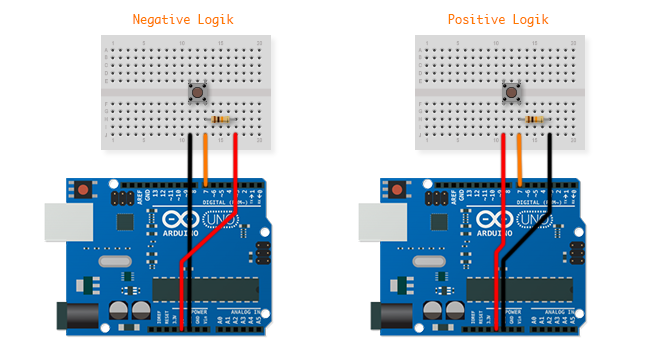
The difference between negative and positive logic lies in the fact that with a negative logic the value at the digital pin is pulled to 0V (LOW) when the button is pressed. If the button is not pressed, however, a small current flows to 5V and pulls the value on the digital pin-up (HIGH). With positive logic, it's the other way around.
This so-called pull-up or pull-down resistors ensure that the voltage drops or increases when the button is not pressed. Without them, a lingering charge or interference might cause a false reading in the off state of the button.
One of the two logics can be used to read a button on the Arduino - both work in a similar way. The code is as follows:
#define BUTTON 7 // The Button is on Digital Pin 7
#define LED 13 // The LED is on Digital Pin 7

void setup()
{
  pinMode(BUTTON, INPUT); // Use the BUTTON pin as input
  pinMode(LED, OUTPUT); // Use LED Pin as output
}

void loop()
{
  digitalWrite(LED, digitalRead(BUTTON)); // Turn the LED on, when the button is pressed
}
Until now we have used an extra 10kOhm resistor to increase or decrease the voltage at the PIN when the button was not pressed. The microcontroller also has its own internal pull-up resistors that can be activated by programming. This method only works with a negative logic but is very convenient because only a button and no resistor is required. Internal PullUp is activated by calling the digitalWrite (pin, HIGH) function directly after calling pinMode () in setup ().
#define BUTON 2

void setup()
{
  pinMode(BUTON, INPUT);
  digitalWrite(BUTON, HIGH);
}
It can happen that the digitalRead () command is read too quickly in succession, resulting in several “bounces”. This can be avoided if we add something called debouncing. This works with the millis () function to remember the last time the button was pressed and to add a small delay.
#define BUTTON  2  // The Button is on Digital Pin  2
#define LED     13 // LED on Digital Pin 13

int ledState = HIGH;         // Status of LED
int buttonState;             // The current status of Button
int lastButtonState = LOW;   // The last Status of Button

long lastDebounceTime = 0;   // The last time the button was pressed
long debounceDelay = 50;     // The delay for debounce

void setup()
{
  pinMode(BUTTON, INPUT);
  pinMode(LED, OUTPUT);
}

void loop()
{
  int reading = digitalRead(BUTTON); // Read and save the value of the button

  if (reading != lastButtonState)    // Check if the status changed
  {
    lastDebounceTime = millis();     // Save the time
  }

  if ((millis() - lastDebounceTime) > debounceDelay) // Check the how much time has passed
  {
    buttonState = reading;          // Set the state to the value read from digital pin
  }

  digitalWrite(LED, buttonState);   // Turn the LED on or off
  lastButtonState = reading;        // Save the last button state
}
1. Use a button to switch between two LEDs.
2. Write the code so that the change only takes place after pressing the button four times.
3. Program a parrot to repeat an entered sequence.
#define BUTTON  2   // Button PIN definieren
#define LED_ONE 12  // LED 1 an PIN 12
#define LED_TWO 11  // LED 2 an PIN 11

boolean whichLed = false;  // Hier speichern wir, welche LED angesteuert werden soll
boolean buttonState = false;  // Hier speichern wir den momentanen Button Zustand

long debounceDelay = 200;  // Diese Zeit bestimmt die Verzögerung beim Drücken des Buttons
long lastDebounceTime = 0;  // Hier speichern wir den Zeitpunkt, an welchem der Button gedrückt wurde

void setup()
{
  pinMode(BUTTON, INPUT);  // PINs als Aus-/Eingänge setzen
  pinMode(LED_ONE, OUTPUT);  // ...
  pinMode(LED_TWO, OUTPUT);  // ...
}

void loop()
{
  // Wenn der Button gedrückt wird und seit dem leten Mal die Zeit lastDebounceTime
  // vergangen ist, dann akzeptiere den Tastendruck. buttonState verhindert das wiederholte
  // Ausführen des Events.
  if(digitalRead(BUTTON) == LOW && (millis()-lastDebounceTime)>debounceDelay && buttonState == false)
  {
    whichLed =! whichLed; // Die leuchtende LED wechseln
    lastDebounceTime = millis();  // Den aktuellen Zeitpunkt speichern
    buttonState = true; // buttonState auf true setzen
  }

  // Wenn der Button wieder losgelassen wird, kann buttonState wieder freigegeben werden
  if(digitalRead(BUTTON) == HIGH)
  {
    buttonState = false;  // buttonState auf false setzen
  }

  if(whichLed == true) // Erste LED anschalten, zweite aus
  {
    digitalWrite(LED_ONE, HIGH);
    digitalWrite(LED_TWO, LOW);
    Serial.println("Here");
  }
  else  // Zweite LED anschalten, erste aus
  {
    digitalWrite(LED_ONE, LOW);
    digitalWrite(LED_TWO, HIGH);
  }
}
#define BUTTON  2   // Button PIN definieren
#define LED_ONE 12  // LED 1 an PIN 12
#define LED_TWO 11  // LED 2 an PIN 11

boolean whichLed = false;  // Hier speichern wir, welche LED angesteuert werden soll
boolean buttonState = false;  // Hier speichern wir den momentanen Button Zustand

long debounceDelay = 200;  // Diese Zeit bestimmt die Verzögerung beim Drücken des Buttons
long lastDebounceTime = 0;  // Hier speichern wir den Zeitpunkt, an welchem der Button gedrückt wurde

int counter = 0;  // Dieser counter zählt, wie oft der Button gedrückt wurde

void setup()
{
  pinMode(BUTTON, INPUT);  // PINs als Aus-/Eingänge setzen
  pinMode(LED_ONE, OUTPUT);  // ...
  pinMode(LED_TWO, OUTPUT);  // ...
}

void loop()
{
  // Wenn der Button gedrückt wird und seit dem leten Mal die Zeit lastDebounceTime
  // vergangen ist, dann akzeptiere den Tastendruck. buttonState verhindert das wiederholte
  // Ausführen des Events.
  if(digitalRead(BUTTON) == LOW && (millis()-lastDebounceTime)>debounceDelay && buttonState == false)
  {
    counter++;  // Den counter um 1 erhöhen
    lastDebounceTime = millis();  // Den aktuellen Zeitpunkt speichern
    buttonState = true; // buttonState auf true setzen
  }

  // Wenn der Button wieder losgelassen wird, kann buttonState wieder freigegeben werden
  if(digitalRead(BUTTON) == HIGH)
  {
    buttonState = false;  // buttonState auf false setzen
  }

  // Wenn der counter auf 4 steht (der Button also 4 mal gedrückt wurde), wechsele die
  // LED und setze den counter wieder auf 0.
  if(counter == 4)
  {
    whichLed =! whichLed;  // Die leuchtende LED wechseln
    counter = 0;
  }

  if(whichLed == true) // Erste LED anschalten, zweite aus
  {
    digitalWrite(LED_ONE, HIGH);
    digitalWrite(LED_TWO, LOW);
  }
  else  // Zweite LED anschalten, erste aus
  {
    digitalWrite(LED_ONE, LOW);
    digitalWrite(LED_TWO, HIGH);
  }
}
#define BUTTON  2
#define LED_ONE 13

int buttonState [40];
long buttonTime [40];
int lastButtonState = HIGH;

long lastTimePressed = 0;
int timeOutDelay = 2000;
int counter = 0;

boolean replay = false;
int sequenceLenght = 0;

void setup()
{
  pinMode(BUTTON, INPUT);
  digitalWrite(BUTTON, HIGH);
  pinMode(LED_ONE, OUTPUT);
}

void loop()
{
  int reading = digitalRead(BUTTON);

  if(reading != lastButtonState)
  {
    replay = false;
    buttonState[counter] = reading;
    buttonTime[counter] = millis();
    lastTimePressed = millis();
    lastButtonState = reading;
    counter++;
  }

  if((millis() - lastTimePressed) > timeOutDelay)
  {
    sequenceLenght = counter;
    counter = 0;
    replay = true;
  }

  if(replay == true)
  {
    for(int i=0; i<sequenceLenght-1; i++)
    {
      digitalWrite(LED_ONE, !buttonState[i]);
      delay(buttonTime[i+1]-buttonTime[i]);
    }
    replay = false;
    digitalWrite(LED_ONE, LOW);
  }
}
Arduino: DigitalPins - Reference from Arduino.cc
Tom Igoe: Digital Input & Output - Tom Igoe