Arduino and P5.js
All code examples are hosted on Github.
P5.js as a web-based language that can be used with Arduino to allow a fast exchange of information between Arduino and a website. It is the officially supported JavaScript-based library for Processing and renders natively to the Canvas element. P5.js implementation has a very similar API as Processing despite being written in JavaScript and not Java.
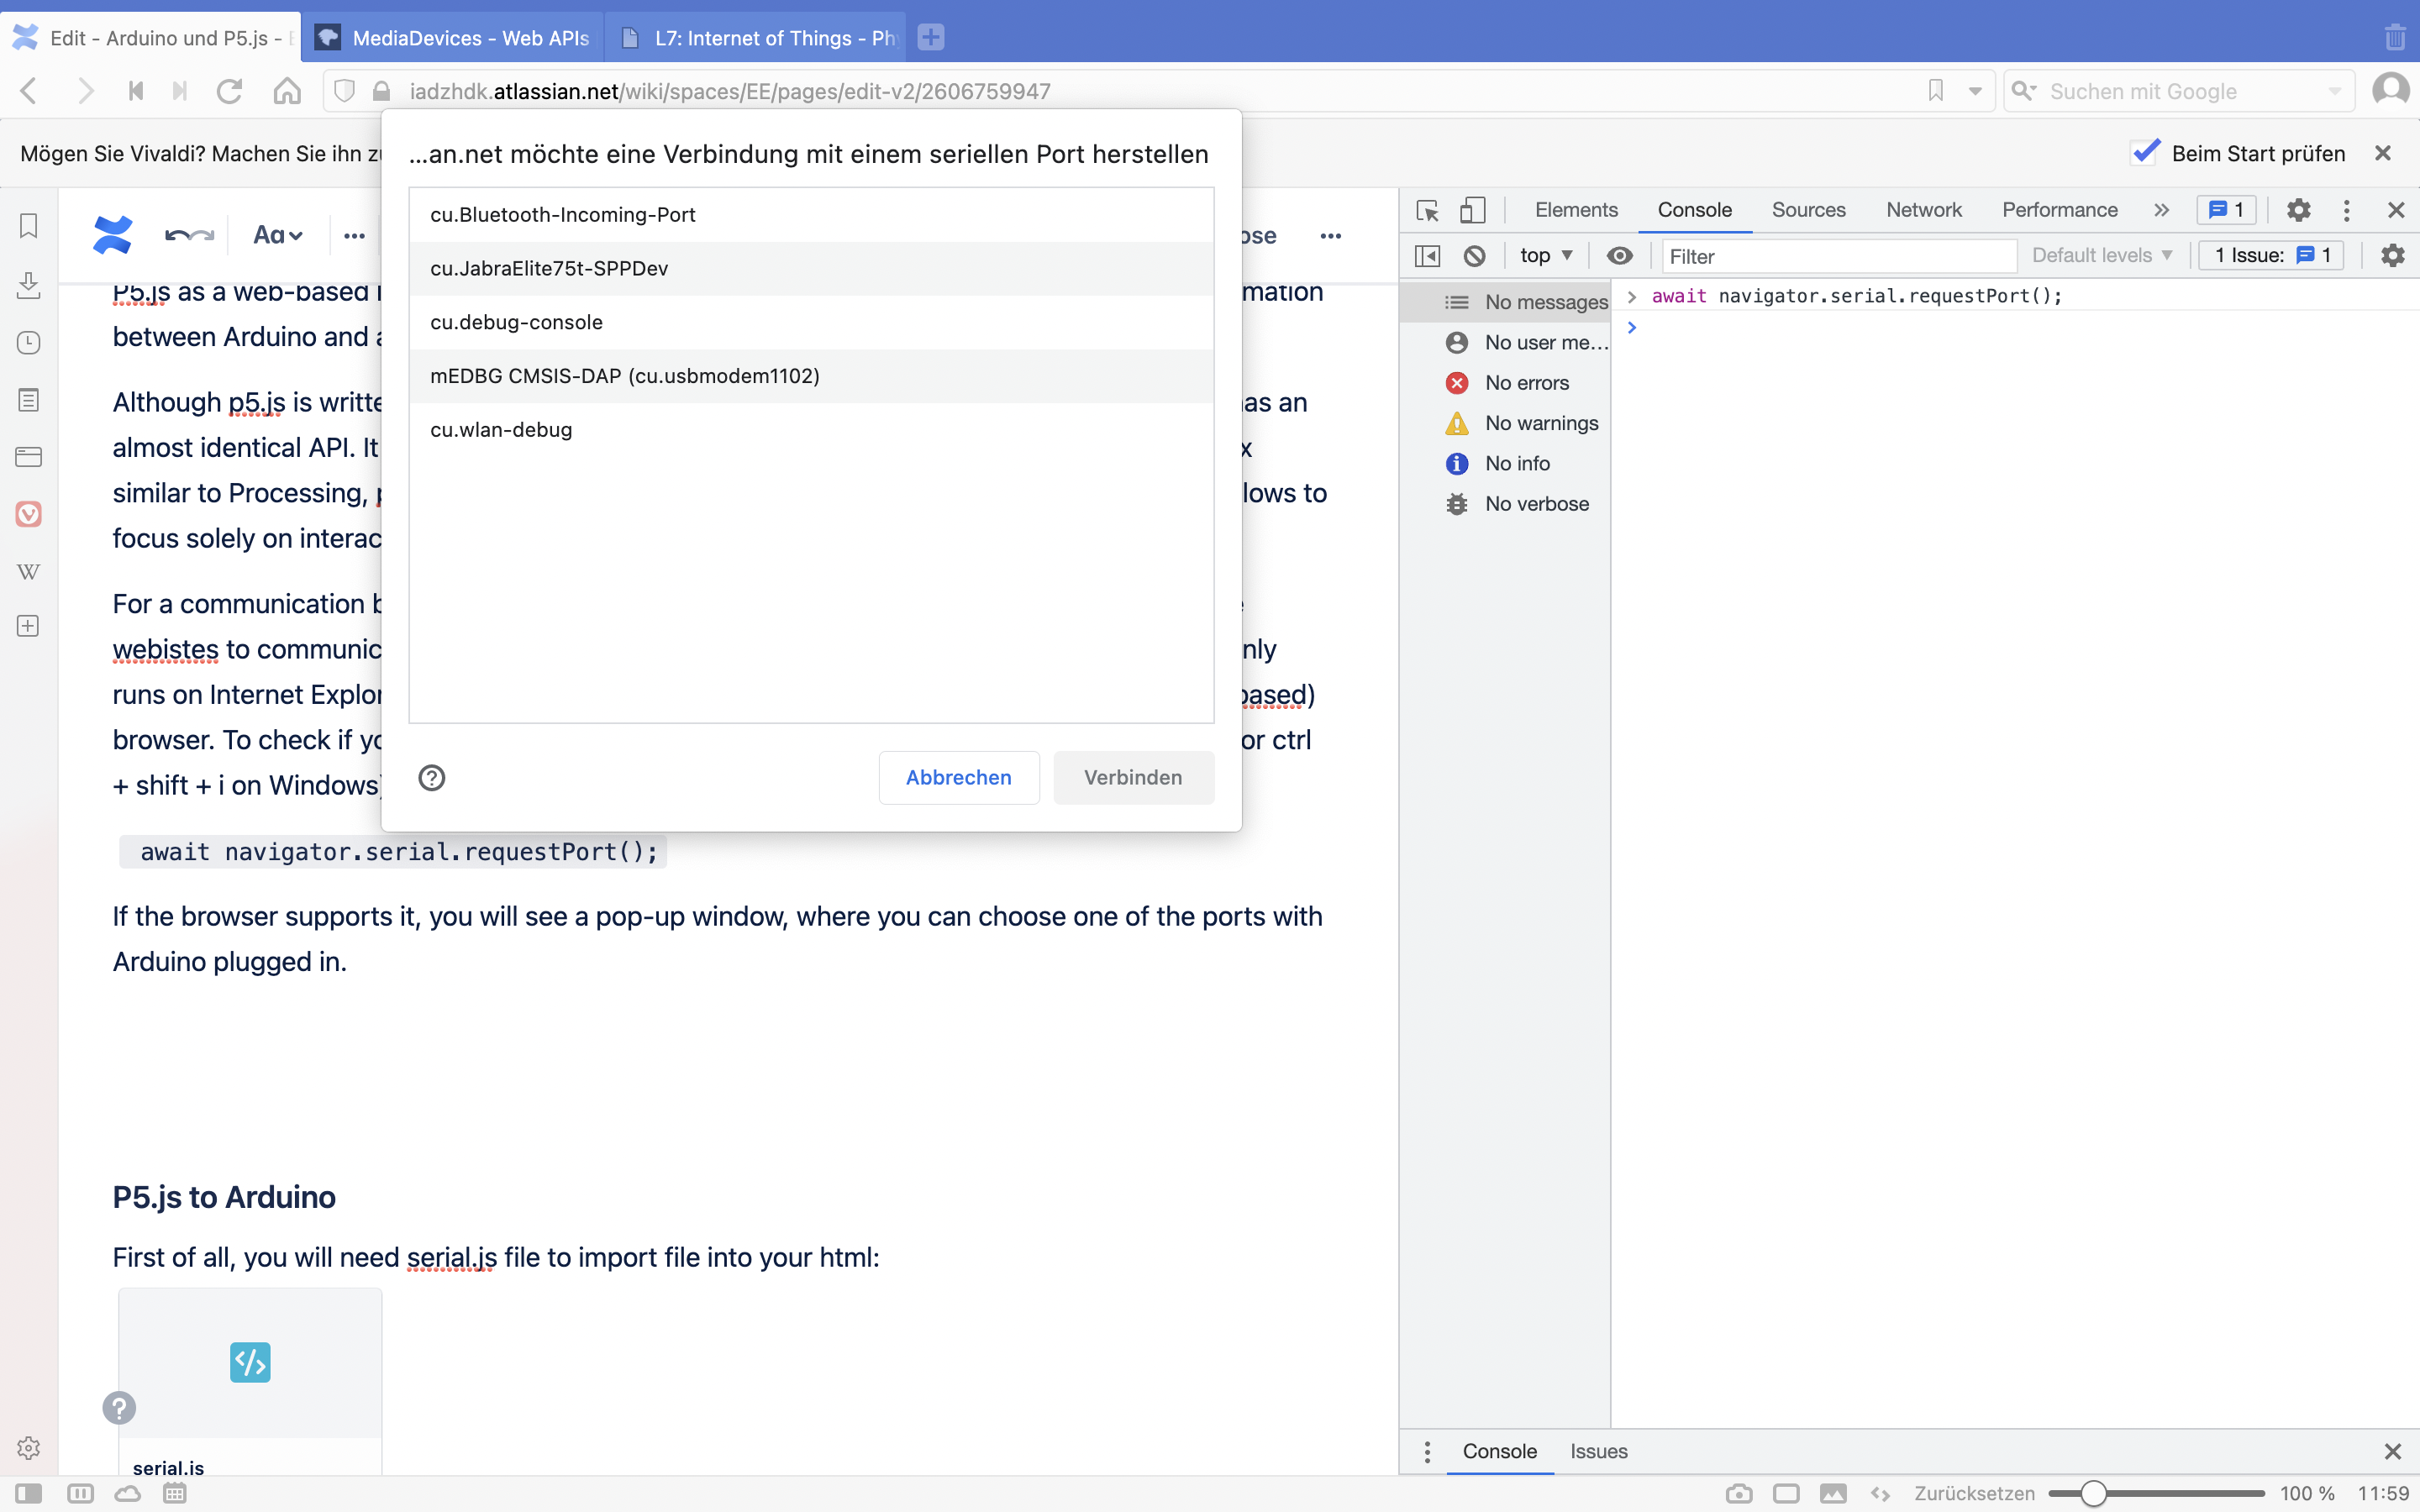
For a communication between p5.js and Arduino, we will use WebSerial API, which enables the websites to communicate with peripherals connected to the computer. Currently, Web Serial only runs on Internet Explorer and Chrome, so to use it, you need to install Chrome (or a Chrome-based) browser. To check if your browser supports WebSerial open a console (cmd + option+ i on Mac or ctrl + alt + i on Windows) and type in:
await navigator.serial.requestPort();
If the browser supports it, you will see a pop-up window, where you can choose one of the ports with Arduino plugged in.
If everything works you are (almost) set! 🔥
BE CAREFUL! If you have Serial port monitor open the connection is going to break up.
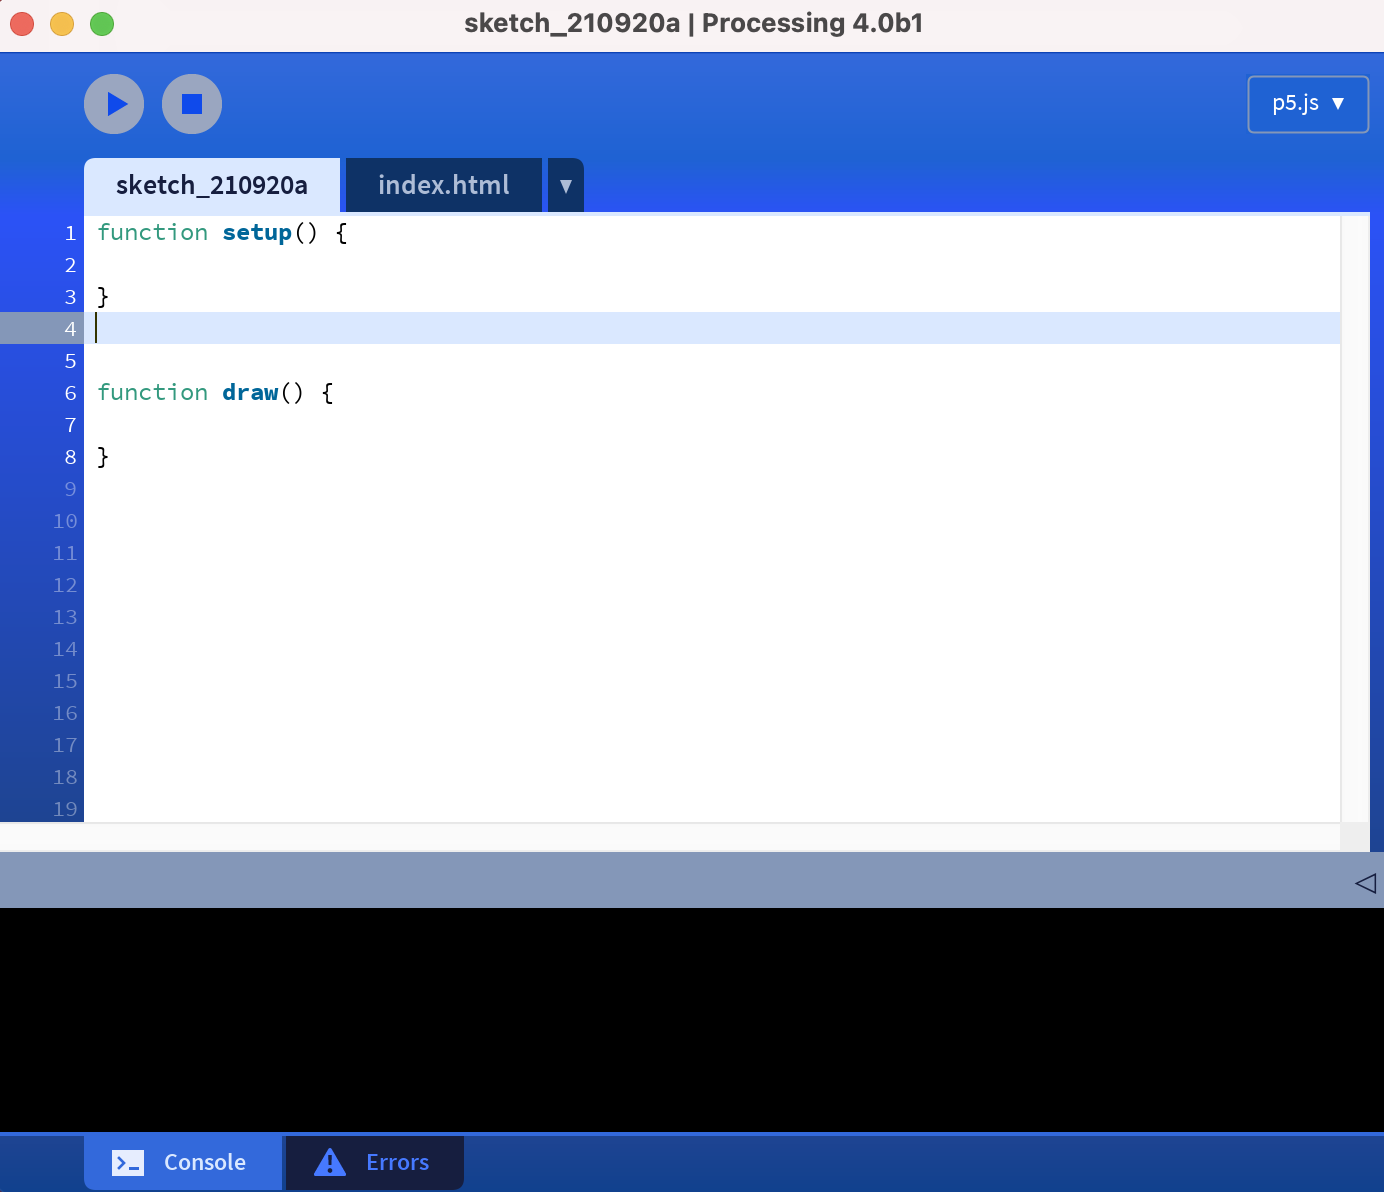
To write code in p5.js we will use Processing, with p5.js mode enabled. Running the sketch opens a live server directly in the browser.
An index.html file is created in each new sketch folder. It contains a section where each .js file from the sketch is added automatically. Removing this block of code (it’s clearly marked in the file) will cause the sketch to no longer run inside the PDE.
Add library files or additional code to the libraries subfolder of the sketch. References to that code will automatically be added to the HTML file, though the libraries won’t be visible as tabs in the Editor.
Like everything else in the PDE, this uses the data folder (unlike many p5js examples which use an assets folder). Because sketches must specify assets in the path, it's just as easy to do that as to specify data instead (rather than rewrite file handling in the PDE).
To make use of WebSerial API make sure that you include serial.js in libraries subfolder (as in the example) or use jsDelivr service:
<script src="https://cdn.jsdelivr.net/gh/makeabilitylab/p5js/_libraries/serial.js"></script>
To connect with already connected port use: serial.autoConnectAndOpenPreviouslyApprovedPort(serialOptions);
To open the port menu use:
serial.connectAndOpen(portInfo, serialOptions);
serial.on subscribes to the events of the Serial class and handles the proper communication between WebSerial API and Arduino.
serialWriteTextData(); and serialWriteNumberData(); uses serial.writeLine(); to write values to Arduino. Notice the extra “<“ and “>” signs, which mark the beginning and end of a message.
Alternative Method with IDE
Install VS Code : https://code.visualstudio.com/docs/setup/setup-overview
Follow the steps in the video to properly setup p5.js in VS Code.
Two-way Communication Simple Example
The following example demonstrates two-way communication between Arduino and P5js. This example shows a simple way to avoid the delay() function; delay() can cause many issues on Arduino and can be a big problem if we want to read incoming serial communication. However, if we only send serial out on the Arduino, the delay() function will generally be ok to use.
Setup
For this example, we need to include the serial library in our p5js sketch.
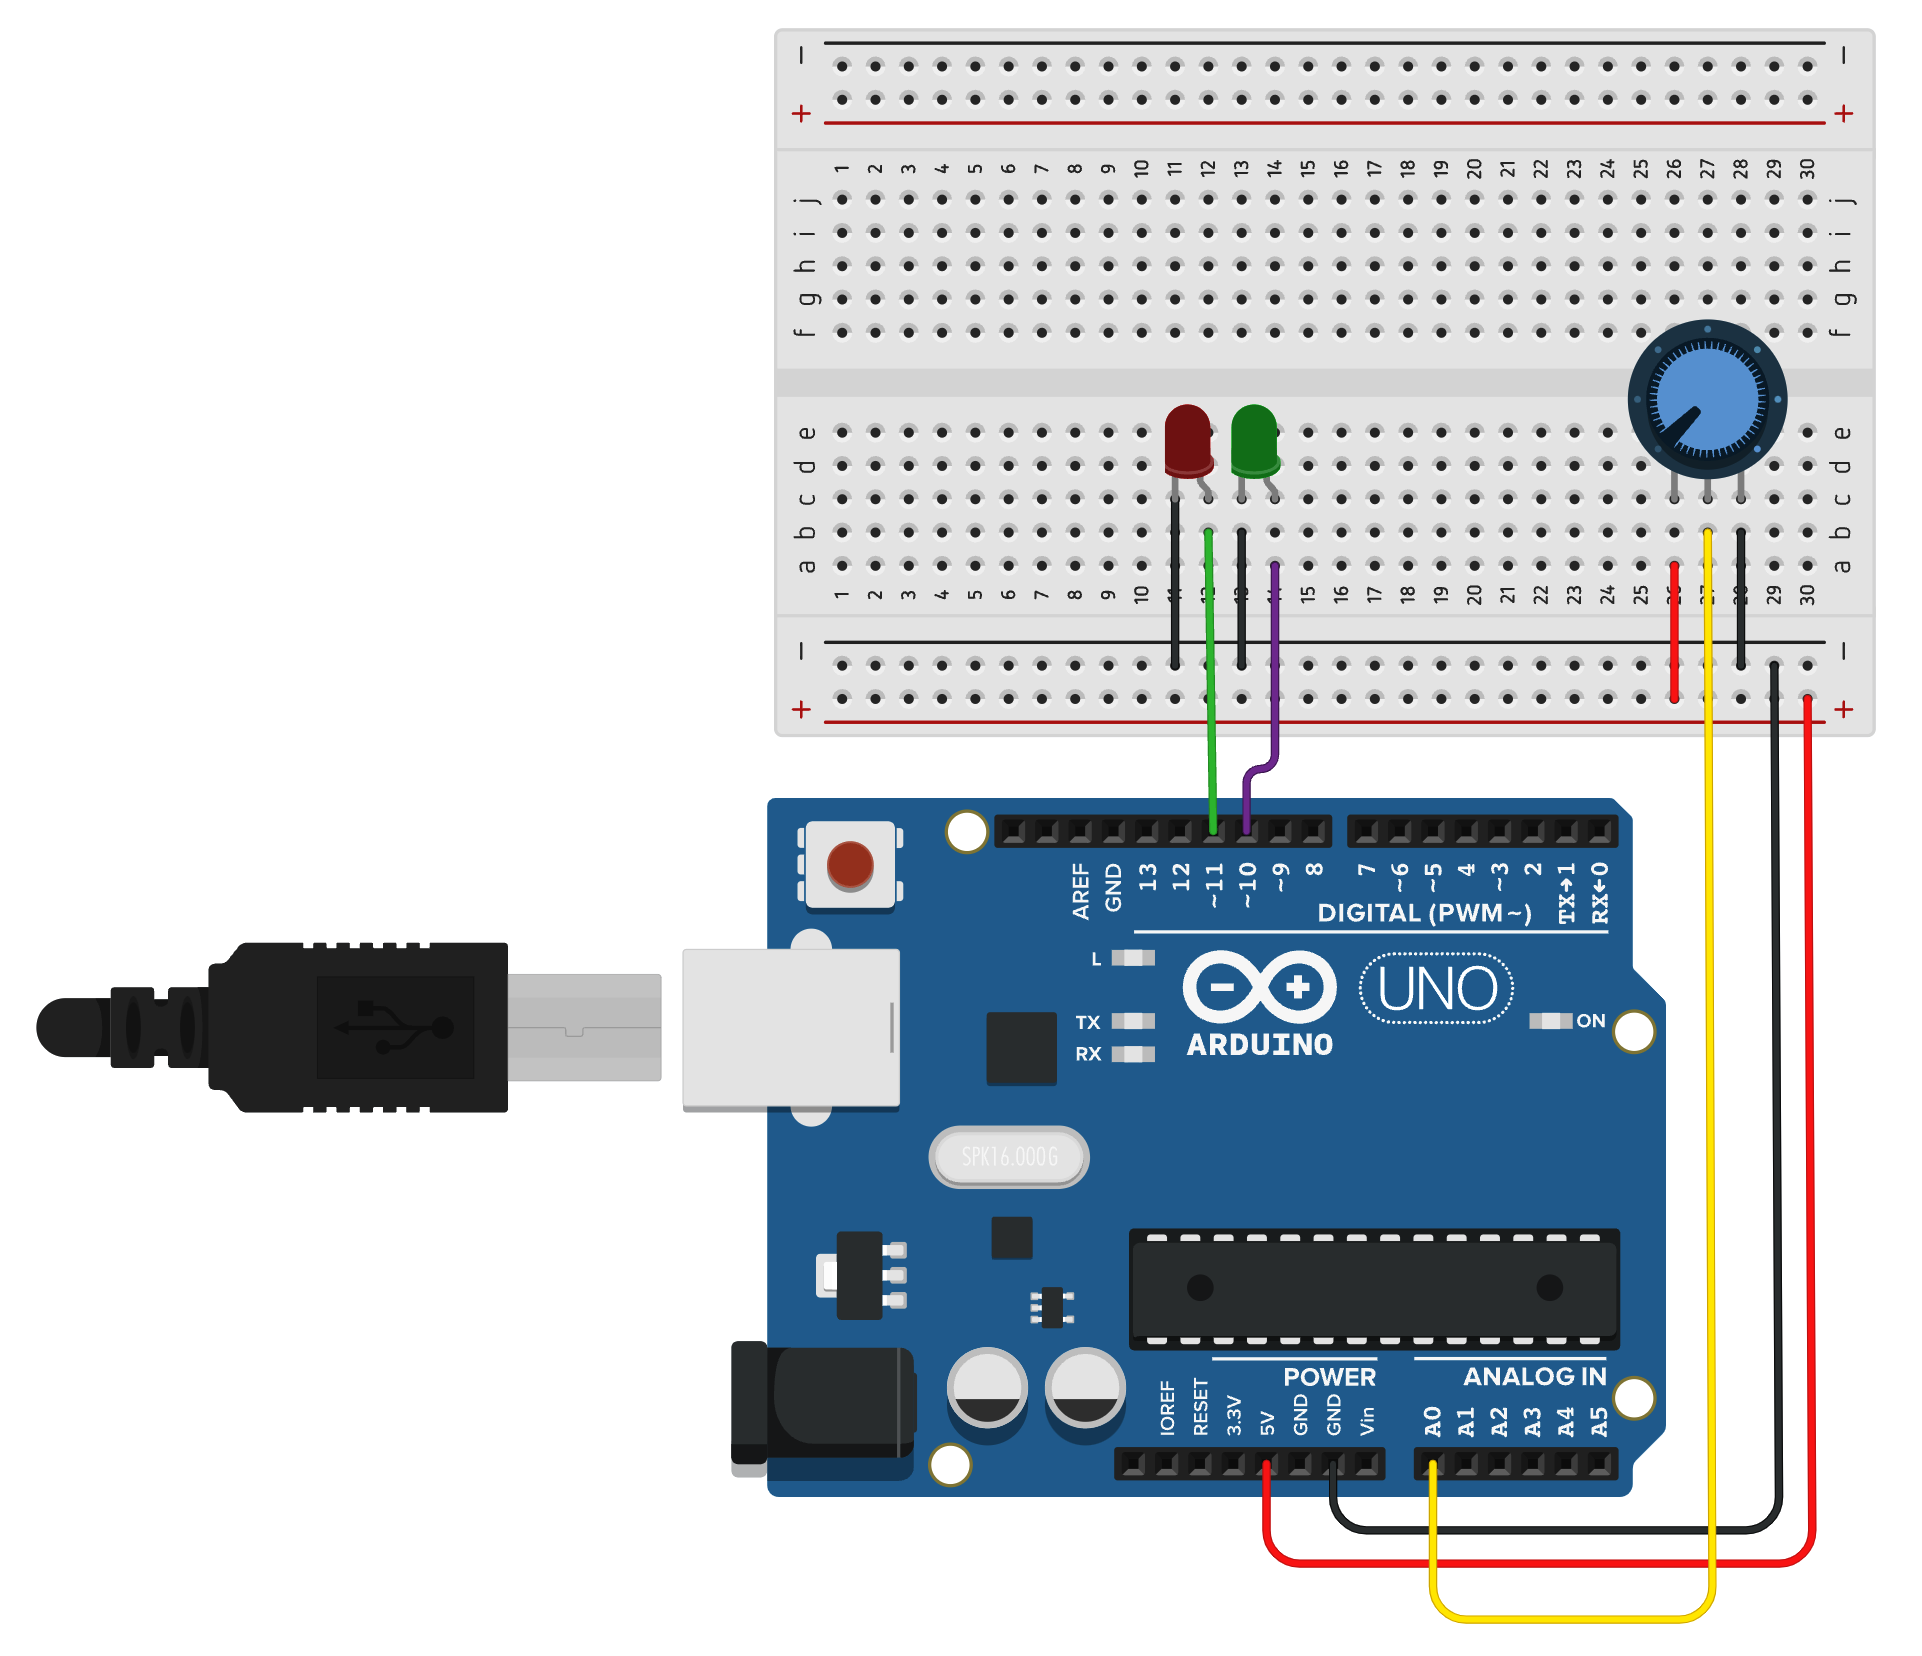
We can also set up the following circuit to check our inputs and outputs on the Arduino, although the code will still work without these parts connected or with an alternative sensor on A0.
Arduino Code:
#define NUM_VALUES 2
#define OUTPUT_PIN1 11
#define OUTPUT_PIN2 10

long lastSerialOut = 0;

void setup() {
  Serial.begin(9600);
  pinMode(OUTPUT_PIN1, OUTPUT);
  pinMode(OUTPUT_PIN2, OUTPUT);
}

void loop() {

  if (millis() > lastSerialOut + 100) { // only send once every 100 miliseconds
     // Send sensor data out over Serial
      Serial.println(analogRead(A0)/4);
      lastSerialOut = millis();
  }

}

/*
  SerialEvent occurs whenever a new data comes in the hardware serial RX. This
  routine is run between each time loop() runs, so using delay inside loop can
  delay response.
*/
void serialEvent() {
  // Check to see if there is any incoming serial data
  if (Serial.available() > 0) {

    int incomingValues[NUM_VALUES];
    // read string until the end of the line
    String rcvdSerialData = Serial.readStringUntil('\n');
    split(rcvdSerialData, incomingValues, NUM_VALUES);

    analogWrite(OUTPUT_PIN1, incomingValues[0]);
    analogWrite(OUTPUT_PIN2, incomingValues[1]);
  }
}

void split(String inputString, int returnData[], int numOfValues) {
  // split comma seperated values into an array
  int index = 0;
  int lastPos = 0;

  for (int i = 0; i < inputString.length(); i++) {
    if (inputString.charAt(i) == ',' || inputString.charAt(i) == ';' && index < numOfValues) {
      String tempStr = inputString.substring(lastPos, i);
      // uncoment this line to test
     // Serial.println(tempStr);
      returnData[index] = tempStr.toInt();
      index++;
      lastPos = i + 1;
    }
  }
}
P5js Code:
let msg;
let serialOptions = { baudRate: 9600 };
let serial;
let isConnected = false;
let dataIn = 0;
let textY = 40;

function setup() {
  createCanvas(500,500);
  background(100);
  textFont('Courier New');
  textSize(20);
  // Setup Web Serial using serial.js
  // remember to include the library in index.html:   <script src="https://cdn.jsdelivr.net/gh/makeabilitylab/p5js/_libraries/serial.js"></script>
  serial = new Serial();
  serial.on(SerialEvents.CONNECTION_OPENED, onSerialConnectionOpened);
  serial.on(SerialEvents.CONNECTION_CLOSED, onSerialConnectionClosed);
  serial.on(SerialEvents.DATA_RECEIVED, onSerialDataReceived);
  serial.on(SerialEvents.ERROR_OCCURRED, onSerialErrorOccurred);
  msg = "Not connected";

}

function draw() {
  background(dataIn);
  fill(0,255,0);
  text(msg,40,textY)
}

function mouseMoved() {
  let mapedX = map(mouseX,0,width,0,255);
  mapedX = floor(mapedX);
  let mapedY = map(mouseY,0,height,0,255);
  mapedY = floor(mapedY);
  serialWriteArrayData([mapedX, mapedY]);
}

function mouseClicked() {
  if (!isConnected) {
    isConnected = connectPort();
  }
}

async function connectPort() {
  if (!serial.isOpen()) {
    await serial.connectAndOpen(null, serialOptions);
  } else {
    serial.autoConnectAndOpenPreviouslyApprovedPort(serialOptions);
    return true;
  }
}

 function onSerialErrorOccurred(eventSender, error) {
  console.log("onSerialErrorOccurred", error);
  msg = "Serial Error Occurred!";
}

function onSerialConnectionOpened(eventSender) {
  console.log("Serial connection opened successfully");
  msg = "🌈 connected!";
}

function onSerialConnectionClosed(eventSender) {
  console.log("onSerialConnectionClosed");
  msg = "Connection Closed!";
}

function onSerialDataReceived(eventSender, newData) {
  console.log("onSerialDataReceived", newData);
  msg += newData;
  msg += "\n";
  dataIn = int(newData); // convert to an int;
}

async function serialWriteArrayData(data) {
  if (serial.isOpen()) {
    let dataFormated = "";
    for(i=0;i<data.length;i++) {
      dataFormated +=data[i];
      dataFormated += ",";
    }
    console.log("send data: "+dataFormated)
        serial.writeLine(dataFormated);
  }
}
Handling comma-separated values in p5js:
The following function can be used to handle comma-separated values in p5js.
function splitString(inputString) {

  let array = inputString.split(',');

  for(let i = 0; i<array.length; i++) {
      array[i] =  array[i].trim();
      array[i] = parseFloat(array[i]);
    }
return array;
}
Usage:
let newArray = splitString(incomingString);