Actuators and Outputs
Actuators are electromechanical components that translate electrical current into physical or mechanical energy (motion or pressure). On this page, we will also consider other transducers that translate electrical energy into light, heat or some other physical phenomena. In a sense, outputs can be seen as the opposite to sensors, which translate physical or mechanical quantities into electrical impulses. In many cases inputs (sensors) and matching output are based on the same principles and some devices can even work as both inputs and outputs. To give us an overview, we divide the outputs we use into different groups. Many of the actuators presented here require more voltage and current than an Arduino can supply at an output. Therefore it is recommended to use either a transistor as switch (when working with DC current) or a relay as switch (when working with mains voltage), or a dedicated driver circuit.
Motion
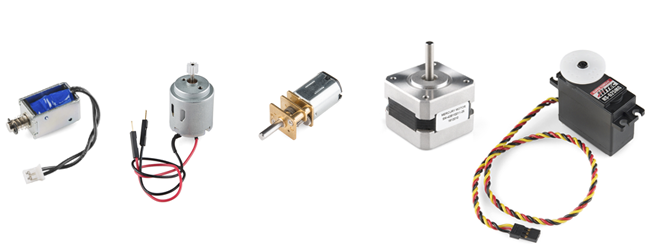
Solenoids
Solenoids are mainly used in sealing systems (doors, vents, windows, etc.). Their function is based on electrodynamics and they consist of a coil, an iron core and a return spring. When a voltage is applied to the coil, the iron core is moved very quickly - if the voltage drops, the return spring ensures that the iron core is returned to its original position. Solenoid can generate haptic feedback, but are mostly commonly used for locking mechanism and bell hammers in alarms. To control a solenoid with the Arduino we must use a transistor as switch.
DC motors
DC motors are the most common actuators in electrical engineering. They essentially come in two types as normal and brushless. Normal DC motors can be driven with the Arduino via a transistor as switch or by means of an H-bridge. To control brushless motors a special controller - a so called ESC (Electronic Speed Controller) has to be used.
Geared motors
Geared motors are functionally the same as DC motors. However, they have a gearbox which ensures that on the one hand the speed of the motor is reduced and on the other hand the power of the drive is increased. There are different types of gears (spur gear, worm gear, etc.) which should be selected depending on the intended use. In addition, there are variants which include a rotation encoder.
Stepper motors
Stepper motors are also DC motors which are driven by a rotating magnetic field. They are mainly used in robotics, printers and 3D printers. The advantage of this type of motors is that they allow very precise positioning, depending on the design. In addition, the number of steps can be directly transferred to an angular position. For this purpose, there are specifications in the data sheets of these motors about how many degrees one step of the motor corresponds to. To operate stepper motors on the Arduino, special IC's (H-bridge) or ready-made stepper motor drivers are used.
Haptic Feedback
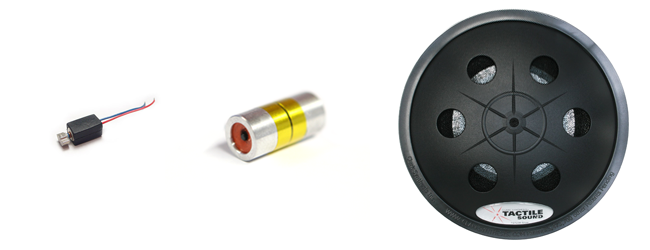
Haptic Engines
Haptic engines come in two main varieties, Linear Resonant Actuators (LRA) and Eccentric rotating mass (ERM) actuators. An ERM is simply a vibration motor (see below), whereas an LRA is a small hammer like device, requiring either an alternating current or a specialised driver IC. LRA offer stronger feedback for same size compared to ERM, less less power consumption compared to ERM and quicker response. Most phone manufacturers have switched to using LRA, and Apple even uses a patented custom built LRA in its devices.
Vibration motors
Vibration motors are small DC motors that generate a vibration by means of a weight, i.e Eccentric rotating mass (ERM). They are used among other things in cell phones and game controllers. With the Arduino they can be controlled by a transistor as switches, or even directly from a digital pin.
Haptuators
Haptuators generate very precise haptic feedback via two opposing solenoids. For small applications we use the models from Tactile Labs for larger applications we use the models from Clark Synthesis. The haptuators require an audio signal and should be driven by an appropriate amplifier.
Heating and Cooling Elements
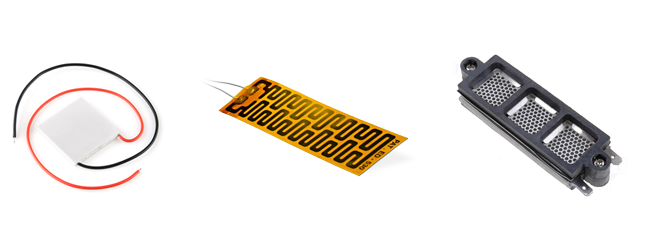
Peltier Element
A Peltier element is an electronic component that can be used for both cooling and heating. It uses the Peltier effect, which allows a temperature change when a voltage is applied. We can operate these elements with the help of a transistor as switch on the Arduino. If the Peltier element is to both cool and heat on the same side, the use of an H-bridge is suitable.
Heating foils
Heating foils are very flat and mostly flexible heaters. They work by converting the applied voltage into heat through a resistor. To a certain extent, one can thus speak of a very inefficient resistor. They come in different sizes, shapes and thicknesses and should be selected depending on the purpose of use. In addition, there is also the possibility to make your own heating foils. On the Arduino we control heating foils using a transistor as switch.
PTC heating elements
PTC heating elements are based on a ceramic material, which changes its resistance when a voltage is applied and converts it into heat. The advantage over heating foils is that when a limit temperature is reached, the resistance becomes almost infinite, so they do not require active control of the maximum temperature. Also here we use a transistor as switches and the elements with the Arduino to be able to control.
Light
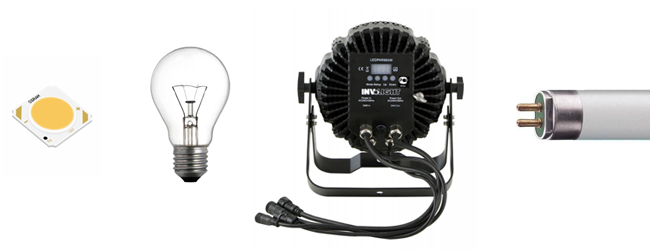
LEDs
LEDs or Light Emitting Diods are the most widely used lighting elements in electronics. This is because they are very efficient (low current consumption) and very maintenance-free. The luminous effect of an LED is based on a semiconductor element, which is excited to glow when a voltage is applied. Depending on the color value of the LED, different semiconductor materials are used. There are red, green, blue and yellow LEDs. To emit white light, the three basic colours red, green and blue are always mixed in a suitable ratio. Meanwhile, there is a wide range of different designs (SMD, through hole, etc.) and brightness. Depending on the type and brightness, the voltage and current consumption can differ considerably, which is why the data sheet should always be consulted. The following rule of thumb applies to the operation of an LED on the Arduino: If voltage is less than 5V and current consumption less than 40mA, then operate directly and otherwise use a transistor as a switch.
NeoPixel and Dotstar
NeoPixel and Dotstar are both names invented by Adafruit for lines of popular addressable LEDs. The Dotstar (4 pin) is based on the APA102 , and the NeoPixel (3 pin) is based WS2812, WS2811 and SK6812. While there are advantages and disadvantages to each type, both offer the ability to control hundreds or even thousands of LEDS, with just a couple of Arduino pins, and without having to using external transistors or relays to control power. Adafruit provides well documented libraries for controlling both types of LEDs.
Incandescent lamps
Incandescent lamps or bulbs are the classic light sources, which were first built by Thomas Edison in 1879. They are based on joule heating, whereby current running through a thin wire will heat up so much that it starts to glow. There are a variety of designs, sizes and luminosities. Also, incandescent lamps can be operated by both direct and alternating current. Incandescent lamps are extremely inefficient compared to LED lamps, but they have a certain aesthetic quality and produce heat as a by product which may be desirable in some cases. If we want to run a bulb on AC controlled by Arduino we use a relays as switches, if we want to run a DC bulb we can use transistors as switches.
DMX Lights
For a long time, stage technology has relied on its own protocol to control lights and other effect devices. This protocol is called DMX (Digital Multiplex) and is supported by many devices. The good thing about DMX is that only the parameters are transferred via this protocol and no direct transmission of power takes place. Furthermore 512 channels with 8bit resolution each (256 values) can be controlled with only one connection. These features make DMX very interesting for interaction designers interested in spatial lighting. We have our own DMX Shield, which can be used very well with the Arduino using the DMX Simple Library.
Fluorescent lamp
Fluorescent lamps are mainly used in the field of building services. A fluorescent lamp glows as soon as we apply AC voltage to it, which stimulates a gas inside to glow. To control a fluorescent lamp with the Arduino we need a relay as a switches.