Embodied Sensor Kit
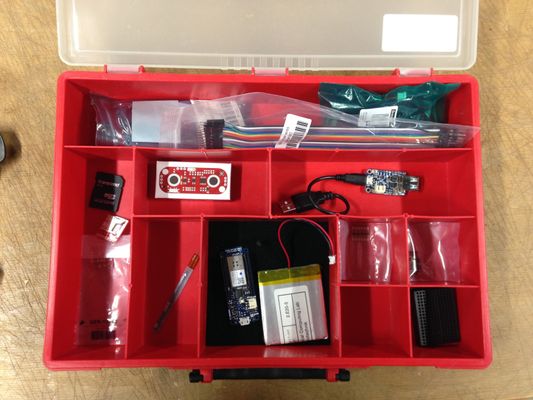
Kit includes:
- MyoWare Muscle Sensor: https://learn.adafruit.com/getting-started-with-myoware-muscle-sensor
- Adafruit 16 bit ADC: https://learn.adafruit.com/adafruit-4-channel-adc-breakouts
- Pulse Sensor: https://github.com/WorldFamousElectronics/PulseSensorStarterProject
- Gyroscope/accelerometer: https://learn.sparkfun.com/tutorials/mpu-9250-hookup-guide?_ga=2.116971910.1075956080.1510670142-435395807.1449067773
- Temperature Sensor LM35: http://www.instructables.com/id/ARDUINO-TEMPERATURE-SENSOR-LM35/
- Flex sensor
- 22k resistor (for flex sensor)
- MicroSD card Reader: SD Karten
- Jumper Wires
- USB micro cable
- Lipo Battery
- Lipo Charger
- Mini Breadboard
- 5v step up (for running sensors that require highvoltages)
- Logic Level Shifter (for devices with different logic levels)
- Flex sensor
- Jumper Wires
- 22k resistor (for flex sensor)
- Arduino MKR1000 WIFI: https://store.arduino.cc/arduino-mkr1000
Setting up the MKR1000 for shiftr.io
Creat an acount on shiftr.io, and follow the instructions on the getting started page to create a new namespace and a new token.
Update the folowing line with your Key and Password before uploading the following code to the MKR1000:
while (!client.connect("arduino", "Your Key here ", "Your Password Here"))
// This example uses an Arduino/Genuino Zero together with
// a WiFi101 Shield or a MKR1000 to connect to shiftr.io.
//
// IMPORTANT: This example uses the new WiFi101 library.
//
// You can check on your device after a successful
// connection here: https://shiftr.io/try.
//
// by Gilberto Conti
// https://github.com/256dpi/arduino-mqtt

#include <WiFi101.h>
#include <MQTTClient.h>

const char ssid[] = "BRIDGE";
const char pass[] = "internet";

WiFiClient net;
MQTTClient client;

unsigned long lastMillis = 0;

void setup() {
  Serial.begin(115200);
  WiFi.begin(ssid, pass);

  // Note: Local domain names (e.g. "Computer.local" on OSX) are not supported by Arduino.
  // You need to set the IP address directly.
  client.begin("broker.shiftr.io", net);
  client.onMessage(messageReceived);

  connect();
}

void connect() {
  Serial.print("checking wifi...");
  while (WiFi.status() != WL_CONNECTED) {
    Serial.print(".");
    delay(1000);
  }

  Serial.print("\nconnecting...");
while (!client.connect("arduino", "Your Key here", "Your Password Here")) {
    Serial.print(".");
    delay(1000);
  }

  Serial.println("\nconnected!");

  // client.subscribe("/hello");
  // client.unsubscribe("/hello");
}

void loop() {
  client.loop();

  if (!client.connected()) {
    connect();
  }

  // publish a message roughly every second.
  if (millis() - lastMillis > 100) {
    lastMillis = millis();
    client.publish("/value", String(analogRead(0)));
  }
}

void messageReceived(String &topic, String &payload) {
  Serial.println("incoming: " + topic + " - " + payload);
}
Connecting to Grasshoper
Download the MQTT plugin for Grasshopper , and place all three files in the grasshopper components folder (you can find this with the GrasshopperFolders command). Restart Rhino and Grasshoper.
Place an MQTT and a Timer component on to the canvas. The Broker URI input should recieve the URI for your shiftr.io key.
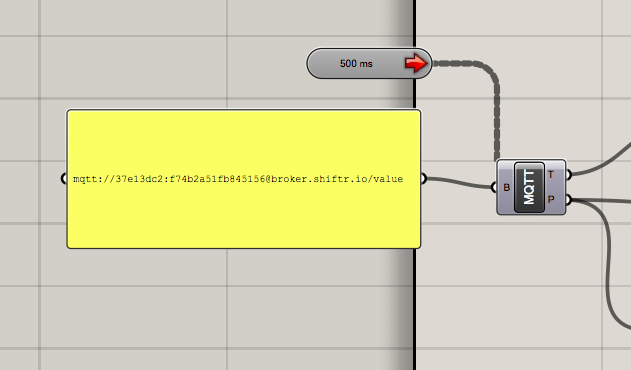
Grasshopper Shifter Example File