p5.js Coordinates
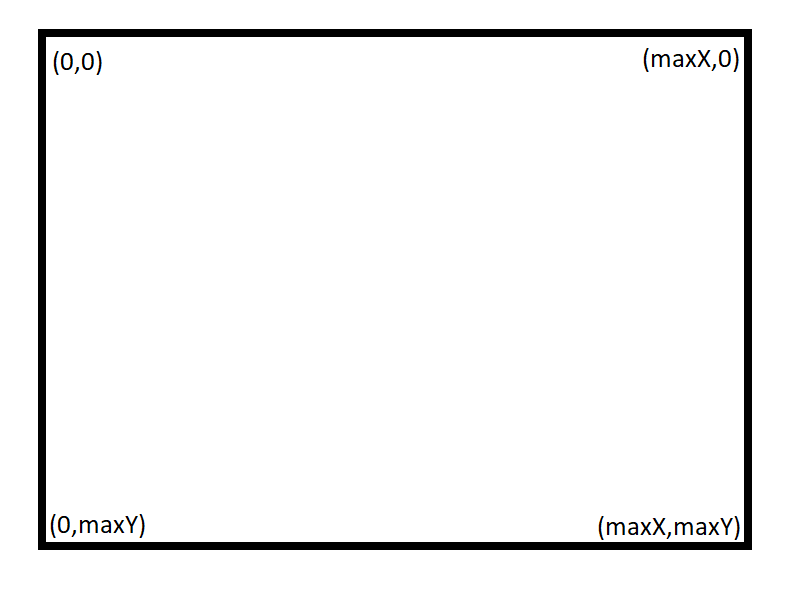
p5.js uses a Cartesian coordinate system, where the zero point is in the upper left corner. The X axis is from left to right and the Y axis is from top to bottom. While this might seem odd, it comes from the tradition that bitmaps were always read in that order. In computer graphics the cartesian coordinate system is almost always used.
In p5.js we can simplify the drawing of objects in many cases by assigning them their own local coordinate system.
Imagine an animation of a car moving across the screen. You can add a value to the the x and y coordinates for every detail of the car to move it across the screen. When it comes to the wheels, it would get complicated as we would not only change the position relative to the car, but also rotate it in relation to the wheel axis!
There are however ways to modify the coordinate system, called transformations, which can make calculations much simpler. There are three basic types of such transformations:
Translation/ Shifting
Rotation
Scaling
It should be noted that such transformations ARE NOT commutative. That means the order that you make the transformations will effect the output. If you work in 3D mode, the third parameter is used for the [z] axis.
Frequently, local and global coordinate systems will be used. The global coordinate system is the original coordinate system, in p5.js this is the one fixed to the upper left corner. If the original coordinate system is transformed, then the result is local coordinate system (in reference to the global). push() and pop() store information related to the current transformation state and style settings.
With an example program, this should be easier to understand:
function setup()
{
  createCanvas(400,400);      // define window size
  strokeWeight(15);    // line thickness
}

function draw()
{
  background(255);    // define background colour
  var radius = dist(mouseX, mouseY, width/2, height/2);  // calculate the distance from the mouse curser to the center of the screen
  radius = map(radius, 0, width, 1, 3);                     // modify the radius to keep it within a specific range.

  push(); // begin a new drawing state
  translate(width/2,height/2); //make this the center point of coordinate system
  rotate(calcAngle());
  scale(radius);
  smiley();          // function call
  pop(); // restore the original state

}


function smiley()
{
  noFill();
  ellipse(0,0,180,180);  // head

  fill(0);
  ellipse(0 - 30,0 - 30,20,20);  // left eye
  ellipse(0 + 30,0 - 30,20,20);  // right eye

  noFill();
  arc(0,0,100,100,radians(20),radians(180-20));  // mouth
}

// calculate the angle from the screen middle to the mouse cursor
// the angle is in radians
function calcAngle()
{
  return -atan2(mouseX - (width / 2),mouseY - (height / 2));
}
This example introduces a couple of new things:
var radius = dist(mouseX, mouseY, width/2, height/2);
Calculates the distance from the mouse pointer to the window centre is determined (see Pythagoras).
var radius = map(radius, 0, width, 1, 3);
The original range is from 0 to the width of the window. The target range is from 1-3. Now radius is transformed from original range to the target range.
-atan2(mouseX - (width / 2), mouseY - (height / 2));
The atan2 function returns the angle in radians at a given coordinate from the 0 point. In this example we shift the 0 point to the centre of the screen in relation to the mouse position by subtracting width/2 from mouseX and height/2 from mouseY.

Exercise
Create a new program where a simple car follows the mouse on the screen from left to right. The car should be drawn from the side, and include wheels that rotate. You may use the example code to get started.
function setup()
{
  createCanvas(900, 400);      // window size
  stroke(0);
  strokeWidth(2);
}

function draw()
{
  rotate(mouseX);
}

function drawCar(x,  y) {
  fill(100);

  beginShape();
  vertex(0, 0);
  vertex(5, -50);
  vertex(50, -50);
  vertex(70, -80);
  vertex(150, -80);
  vertex(190, -50);
  vertex(265, -45);
  vertex(270, 0);
  vertex(0, 0);
  endShape();

  drawWheel(60, 0);
  drawWheel(210, 0);
}

function drawWheel(x, y) {
  let radius = 25;
  fill(150);
  stroke(0);
  strokeWeight(7);
  ellipse(0, 0, radius*2, radius*2);
  strokeWeight(4);
  line(0-radius, 0, 0+radius, 0);
  line (0, 0-radius, 0, 0+radius);
  noStroke();
}
Example Solution
var xScale = 1;

function setup()
{
  createCanvas(900, 400);
}

function draw() {
  background(255);

  var mouseMovement = mouseX - pmouseX; //pmousex gives us our mouse x value from the last frame. Subtracting from the current position give us the distance moved per frame
  if (mouseMovement<0) { // if the movement is negative, then we flip everthing backwards with a negative xcale
    xScale = -1;
  }
  if (mouseMovement>0) { // if the movement is positive, then our xscale is positive
    xScale = 1;
  }

  drawCar(mouseX, height/2);
}

function drawCar(x, y) {

  push();
      translate(x, y);
      scale(xScale, 1);
      fill(100);
      beginShape();
      vertex(0, 0);
      vertex(5, -50);
      vertex(50, -50);
      vertex(70, -80);
      vertex(150, -80);
      vertex(190, -50);
      vertex(265, -45);
      vertex(270, 0);
      vertex(0, 0);
      endShape();
      drawWheel(60, 0);
      drawWheel(210, 0);
  pop();
}

function drawWheel(x,y) {
  let radius = 25;
  fill(150);
  stroke(0);

  push();
  translate(x, y);
  rotate(radians(mouseX));
  strokeWeight(7);
  ellipse(0, 0, radius*2, radius*2);
  strokeWeight(4);
  line(0-radius, 0, 0+radius, 0);
  line (0, 0-radius, 0, 0+radius);
  noStroke();
  pop();

}