Vectors
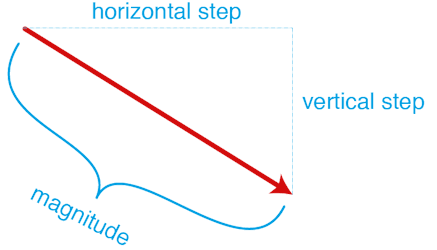
Vectors are enormously useful geometric object in maths and physics. Vectors express a direction and a magnitude (or length), often pictured as an arrow in 2D or 3D space.
Diagram 1. Euclidean vector
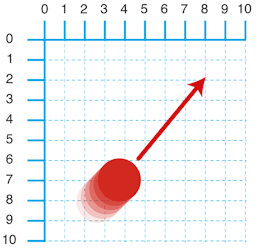
Vectors are key concept not only for producing geometry through code, but also for motion and interactive animation. One of the main uses of vectors are to express velocity, which is both speed and direction of travel.
Diagram 2. Velocity
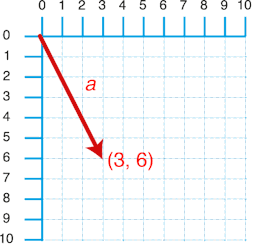
The direction of a vector can be simply represented with an arrow, with the length of the arrow expressing the magnitude. The information to create a 2D vector can be easily recorded with just two numbers, which can be negative or positive.
Diagram 3. Vector a = ( 3, 6 )
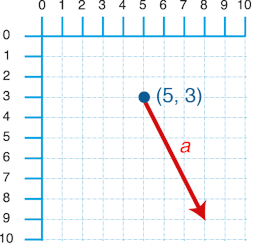
The key thing to remember is that vectors represent direction and magnitude without a location. For this reason vectors are often combined with a coordinate. 2D and 3D coordinates are ofter recorded in the same format as vectors, with just two or three numbers. However, coordinates are normally visually represented as points rather than arrows.
Diagram 4. Vector a, translated to point b (5,3)
There are a number of ways to manipulate and combine vectors with simple operations called vector maths.
Addition and Subtraction
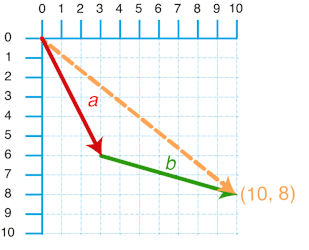
If you add to vectors together, the resulting vector is the equivalent of stacking the vectors end to end. The maths behind it is simple, just add the x positions of each vector together and then add the y positions together. Adding vectors together can be used to simulate simple physics like the effect of wind or gravity, so for every step forward a game character might have a wind vector added to their movement vector. If a character in a game jumps while moving forward, then we also want to add the vectors of the upward movement with the forward motion, and then in reverse when they fall back down (or by adding a gravity vector which points down).
a = ( 3, 6)
b = ( 7, 2)
a + b = (10, 5)
Diagram 5. Vector addition
Subtraction is a useful way of finding a vector between two points. If I subtract two points (x1,y1) from (x2,y2) the result is the vector between the two points.
Scaler Multiplication
Scaler Multiplication only effects the magnitude of the vector, leaving the direction unchanged. However, if the vector is multiplied by a negative, then the direction is reversed! Scaler Multiplication can be used to control the acceleration of space ship or to simulate wind resistance or drag. If an object in a game collides with wall for example, we could multiply the objects vector by -1, to reverse it's direction so that it bounces off the surface.
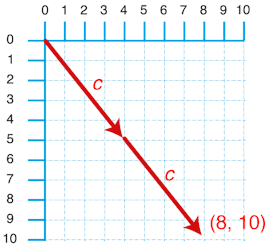
To do a Scaler Multiplication, simply multiply each component in the vector by the multiplication factor.
c = (4, 5)
2*c = (8, 10)
Diagram 6. Vector multiplication
Finding the magnitude
You can find the magnitude (the length) using the Pythagorean theorem. In a car game, you might need to find this value show the speed of an object on the HUD display.
c = (4, 5)
sqrt(4^2 + 5^2)
The PVector class in processing has a method that returns this value: mag();
Normalising
A normalised vector or a unit vector has had its magnitude set to one, with the direction left unchanged. A unit vector shows us a direction alone, without a magnitude. Sometimes we are only interested in direction, and removing magnitude can make many calculations much simpler.
Normalising a vector takes two steps:
1 calculate its magnitude of the vector (see above)
2 Divide each vector components by the magnitude
PVector
Processing has a vector class called ‘PVector‘, which can be two or three dimensions. Basic vector maths are included in a number of methods of the PVector class, so processing can do all the hard work for you.
PVector vec1 = new PVector(1,2);
PVector vec2 = new PVector(3,4);

// read out components of vec1
println(vec1.x);
println(vec1.y);
println(vec1.z);

println(vec1);
println(vec2);

// set new components of vector
vec1.set(10,20);
println(vec1);

// vector addition when creating a new vector
println("-- Vec Add --");
PVector resVec = PVector.add(vec1,vec2);
println(resVec);

// adding a vector to an existing vector
vec1.add(vec2);
println(vec1);

// vector subtraction
println("-- Vec Sub --");
resVec = PVector.sub(vec1,vec2);
println(resVec);

vec1.sub(vec2);
println(vec1);

// vector multiplication
println("-- Vec Mult --");
resVec = PVector.mult(vec1,2);
println(resVec);

vec1.mult(2);
println(vec1);

// find vector magnitude
println("-- Vec Length --");
println(vec1.mag());

// find angle between two vectors
println("-- Vec Angle Between --");
println(degrees(PVector.angleBetween(vec1, vec2)));

// normalise a vector
println("-- Vec Normalise --");
vec1.normalize();
println(vec1);
println(vec1.mag());
Example 1: Gravity
Here we use vectors to create a force of attraction. The force's effect is accumulative, always adding to the velocity of our ellipse. But since the force is sometimes negative, depending on if the ellipse is above, below, left, or right of the mouse, the ellipse is subject to an oscillating effect.
PVector pos = new PVector(200,200);
PVector velocity = new PVector(1,0);

void setup() {
  size(600,600);
  fill(255);
}

void draw() {
  background(0);
  PVector direction = new PVector(mouseX, mouseY);
  direction.sub(pos);  // by subtracting the pos from mouse coordinates, we end up with a vector between the two points
  //
  direction.normalize(); // now we have a vector with the length of 1, this tells us the direction we want to push out ellipse in
  direction.mult(.1); // we shorten the vector (magnitude), this gives us our speed
  velocity.add(direction); //we add the direction to our velocity, so the changes accumulate over time
  pos.add(velocity); // pos + velocity give us our new position!
  ellipse(pos.x, pos.y,30,30);
};
Example 2: Bouncy ball
Here we use vectors to simulate the effect of bouncing. When the ball hits the edges of the canvas, it's vector is inverted in the appropriate axis, sending it back to where it came from.
PVector pos = new PVector(200,200);
PVector velocity = new PVector(1,0);
float damper = 0.99;

void setup() {
  size(600,600);
  fill(255);
}

void draw() {
  background(0);

  velocity.mult(damper); // always slow the ball down to simulate resistance
  pos.add(velocity); // pos + velocity give us our new position!

  // if the ball is above or below the screen, invert the y value of the velocity to send it back where it came from
  if (pos.y<0 || pos.y>height) {
    velocity.y = -velocity.y;
    pos.add(velocity);
  }
   // if the ball is left or right of the screen, invert the x value
  if (pos.x<0 || pos.x>width) {
    velocity.x = -velocity.x;
    pos.add(velocity);
  }
  ellipse(pos.x, pos.y,30,30);

  if(mousePressed) {
     // show us our "line of power"
     stroke(255,0,0);
     line(pos.x,pos.y, mouseX,mouseY);
     noStroke();
  }
};

void mouseReleased() {
    // when the mouse is released we give a ball a big push
    PVector direction = new PVector(mouseX, mouseY);
    direction.sub(pos);  // by subtracting the pos from mouse coordinates, we end up with a vectore between the two points
    direction.mult(.2);  // we shorten the magnitude to reduce the power of the push
    velocity.set(direction); //now we have our new velocity
};
Exercise:
Modify example 2 to include a gravity force. The circles should fall towards the bottom of the screen, where it will bounce up again.
(Harder) Further modify the example so that each mouse press adds a new circle, and releasing the mouse sets the new circles velocity.
(Very Hard) Further modify the example so that each ball bounces off any ball it collides with.
