Analog Input
An analog input can measure a voltage difference. Many phenomena can be measured with simple sensors that output analog voltage value, for example, sound, light intensity, and or preasure. Therefore the Arduino offers the analog inputs (A0-A5) to read such values. To be able to detect a voltage difference (analog signal), the Arduino has a 6 channel, 10-bit analog to digital converter (AD converter). A resolution of 10-bit means that the Arduino detects a voltage difference from 0V to 5V with a resolution of 10-bit. It, therefore, delivers 1024 different values for this range (this corresponds to an accuracy of 4.9 mV per step).
For our purposes, a 10-bit resolution is sufficient. However, there are much more accurate analog to digital converters, with say 16-bit (65535 values) or even 32-bit (approx. 4.3 million values).
Function
To read a signal at an analog pin we use the function analogRead(Pin_Number). This function directly returns us a number between 0 and 1024. We don't need to call pinMode(PIN, MODE) in setup() for this function as we do for digital pins.
Example with a Photo Resistor
One type of simple sensor is a photoresistor. It changes its electrical conductivity (resistance) depending on the incidence of brightness and can therefore also be called a brightness sensor. Many sensors also act as a variable resistor, and unfortunately our arduino isn't designed to measure resistance; we need to convert this resistance to a variation in voltage. To do this, we need a so-called voltage divider circuit.
Voltage Divider
With the help of a voltage divider, we can measure differences in the voltage ratio of two resistors between 0V and Vcc (in our case 5V). Typically one of the resistors is a sensor (variable resistor) and one is a fixed resistor. The circuit looks like this:
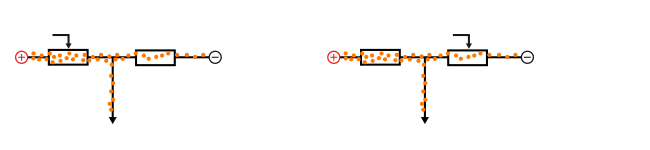
Die entsprechende Formel, deren Herleitung vom Ohmschen Gesetz in diesem Wikipedia Eintrag erläutert wird lautet:
Vres = Vcc*(R2/(R1+R2))
Vres = Resulting Voltage
Vcc = Input voltage (5V)
R1 = 1st resistor (Photoresistor in our case)
R2 = 2nd resistor (Fixed resstiro)
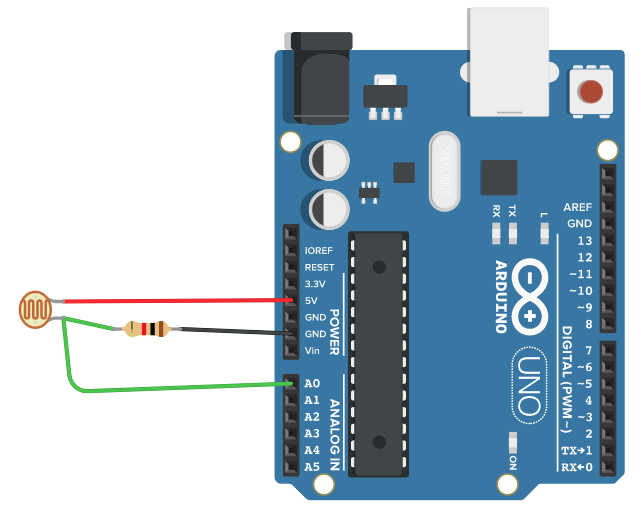
For our photoresistor there is the following circuit:
Example-Code
For the code, let's output the values read from Arduino via the Serial Monitor (see: Serial).
If we look at the values in the Serial Monitor, we see that they change as soon as we hold our hand over the sensor, for example.
Here is another example, where an LED is turned on when it gets dark.
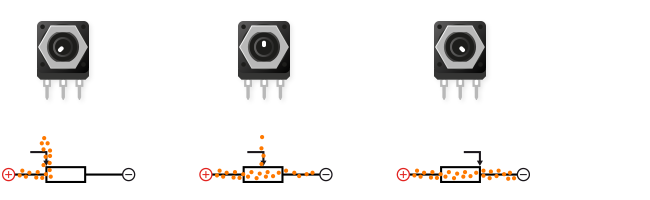
Potentiometers
A potentiometer is a special form of a variable resistor since it functions in itself as a voltage divider. This makes it perfect for generating a fast analog input. The function can be simplified as follows:
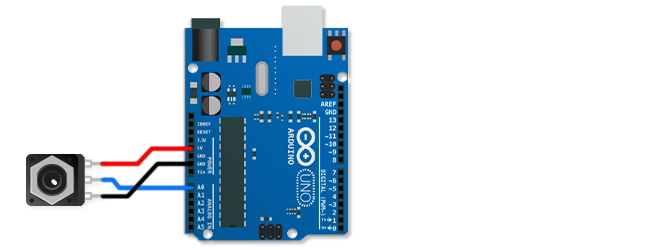
To connect the potentiometer to the Arduino we use the following circuit:
Exercises:
1. Use the circuit with the photoresistor to control the brightness of an LED.
2. Use a potentiometer to control the blinking speed of an LED. 3.
3. Use the potentiometer to control three LEDs one after the other (Poti left = LED_1, Poti middle = LED_2, Poti right = LED_3).
Usefull Functions
map()
Map a value in one range to a new scale
e.g. map(Value, Start_Old_Range, End_Old_Range, Start_New_Range, End_New_Range)
Or in our case
map(Value, 0, 1023, 0, 254)
constrain()
Limits a value to a specific range
e.g. constrain(WERT, 0, 255)