Lynx Smart Motion Servo
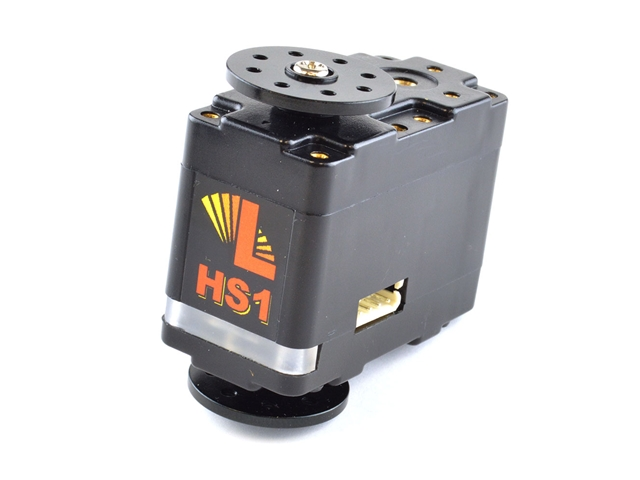
The Lynxmotion Smart Servos (LSS) are compact, modular and configurable actuators that provide greater control than standard PWM servos. The servo lineup currently includes three “smart servos” which appear physically the same, sharing the same dimensions and mounting points but differing in maximum torque and speed.
Power: The servos need 6-12V, and 12v for maximum speed and torque.
Getting Started:
Action Commands:
The lynx motion has a simple serial protocol for controlling the motor, that is human-readable:
Number sign #
Servo ID number as an integer
Action command (two to three letters, no spaces, capital or lower case)
Configuration value in the correct units with no decimal
End with a control / carriage return '<cr>'
Ex: #5PD1443<cr>
Additional Parts:
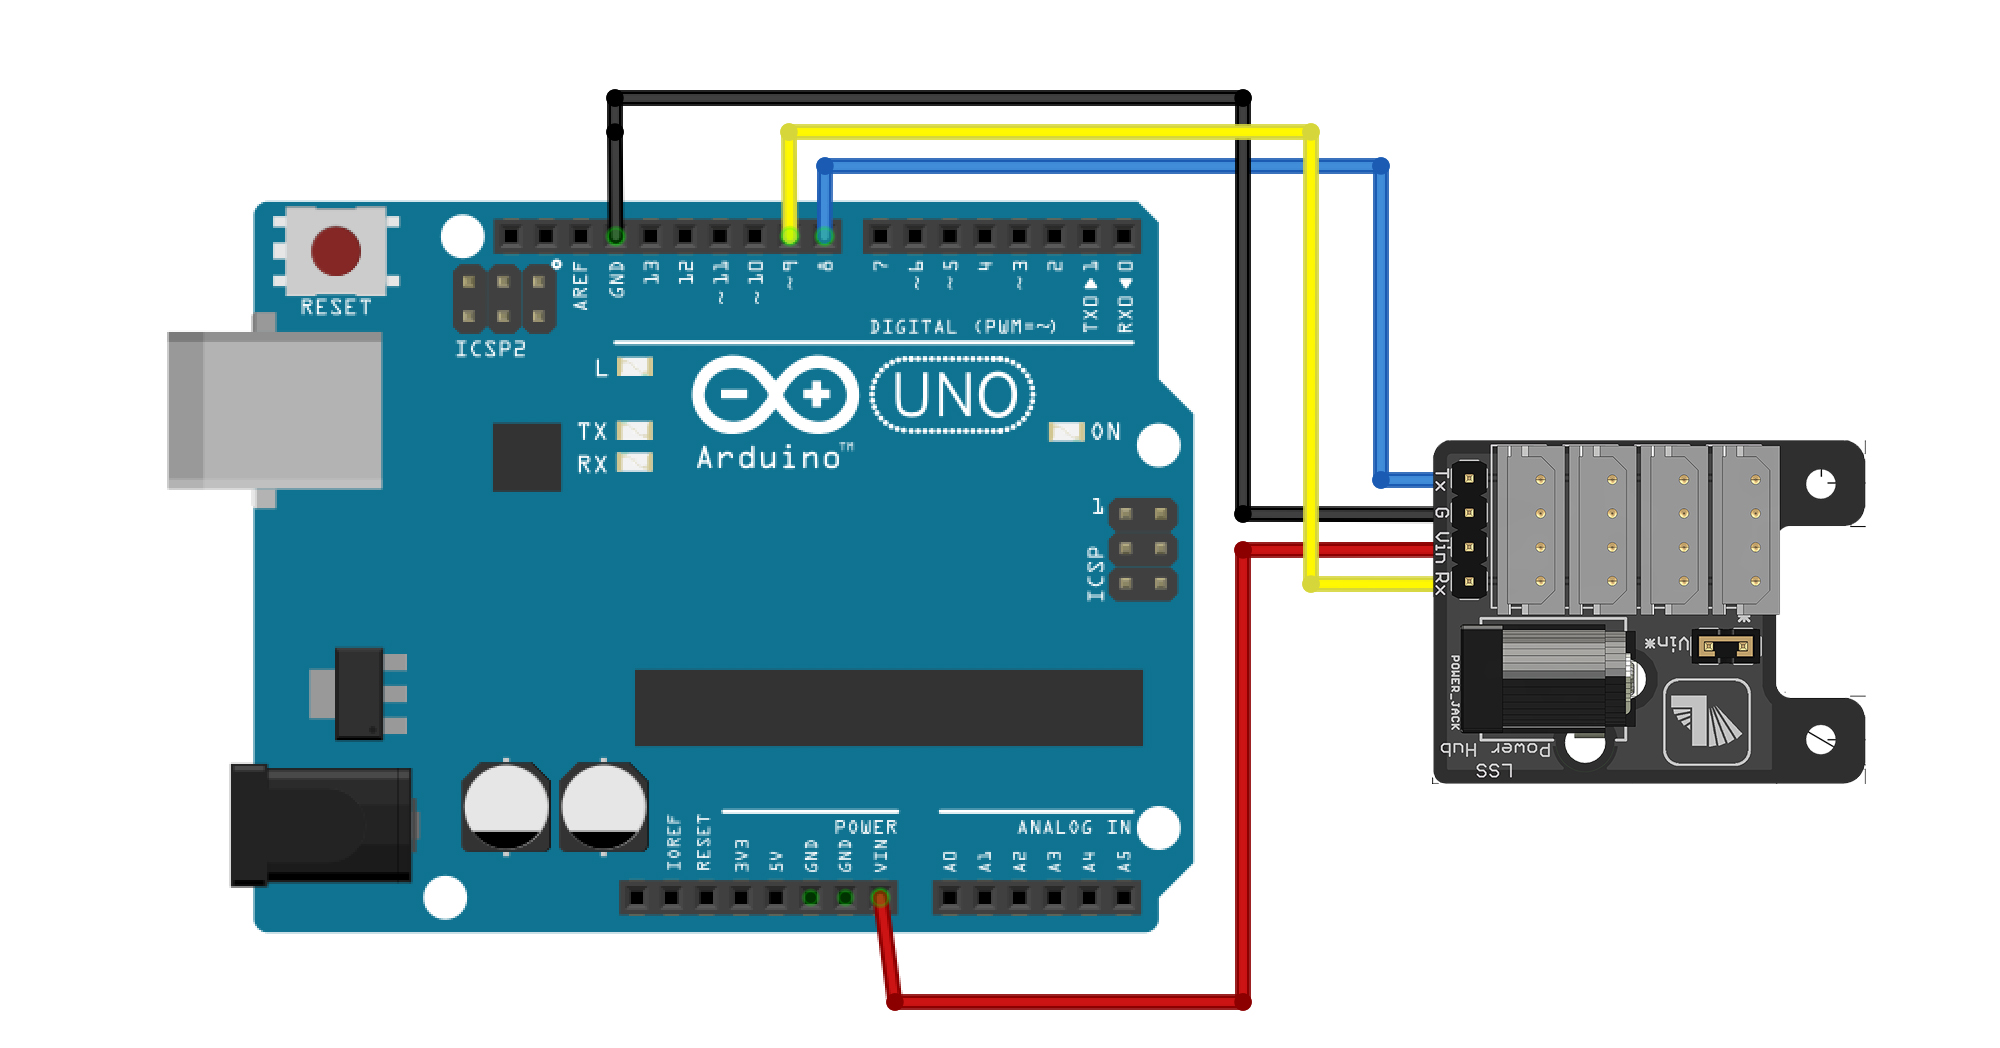
Hookup with Power-hub
The power hub is the most universal way of connecting to the motors. You will need an external power source with a 5mm jack for 12v. Care should be taken when connecting the VIN pin, as this will be 12 volts!
Example Code for Arduino
Ther is a custom LSS library for Arduino, but it's not necessarily needed to control the smart servos, and it is not compatible with the IAD shields for both MKR and Arduino Uno.
This example cycles through the LED colours of the smart servos.
#include <SoftwareSerial.h>

#define rxPin 8
#define txPin 9
SoftwareSerial mySerial(rxPin, txPin);  // Create the new software serial instance

#define LSS_ID 254 // ID 254 to broadcast to every motor on bus


void setup()
{
  mySerial.begin(115200); // Important! this is the standard speed for talking to LSS
  mySerial.print("#0D1500\r");  // this is used to clear the serial buffer
}

void loop()
{
	// Loop through each of the 8 LED color (black = 0, red = 1, ..., white = 7)
	for (uint8_t LEDCode = 0; LEDCode <= 7; LEDCode++){
	// Set the color (session only) of the LSS
    // Options are:
    // LSS_LED_Black = 0
    // LSS_LED_Red = 1
    // LSS_LED_Green = 2
    // LSS_LED_Blue = 3
    // LSS_LED_Yellow = 4
    // LSS_LED_Cyan = 5
    // LSS_LED_Magenta = 6
    // LSS_LED_White = 7
	  mySerial.print(String("#") + LSS_ID + String("LED") + LEDCode + "\r"); // set LED
	 delay(1000);
	}
}
This example goes through the basic setup and movement
#include <SoftwareSerial.h>

#define rxPin 8
#define txPin 9
SoftwareSerial mySerial(rxPin, txPin);  // Create the new software serial instance

#define LSS_ID 254 // ID 254 to broadcast to every motor on bus

void setup()
{
  mySerial.begin(115200); // Important! this is the standard speed for talking to LSS
  mySerial.print("#0D1500\r");  // this is used to clear the serial buffer
}

void loop() {
  // Move the LSS continuously in one direction
  mySerial.print(String("#") + LSS_ID + String("WR") + 10  + "\r"); // RPM move
  delay(5000);
  // Move the LSS continuously in the oposite direction
  mySerial.print(String("#") + LSS_ID + String("WR") + -10  + "\r"); // RPM move
  delay(5000);
  // faster!
  mySerial.print(String("#") + LSS_ID + String("WR") + -60  + "\r"); // RPM move
  delay(3000);
  // go Limp!
 mySerial.print(String("#") + LSS_ID + String("L") + "\r"); // Limp
  delay(5000);
  // move relative from current position in 1/10° (i.e 100 = 10 degrees)
  mySerial.print(String("#") + LSS_ID + String("D") + int(60*10)  + "\r"); // move 100 degrees
  delay(5000);
  // Move to specific position in 1/10° (i.e 100 = 10 degrees)
  mySerial.print(String("#") + LSS_ID + String("D") + int(360*10)  + "\r"); // move 360 degrees
  delay(7000);
}
Multiple Servos
For controlling multiple servos, you will first need to give each motor a unique ID. You must attach each motor separately and modify the code below to change its ID to a value between 0 and 253. Afterwards, the servo will always remember it’s new ID.
#include <SoftwareSerial.h>

SoftwareSerial mySerial(8, 9);

// ID set to default LSS ID = 0
#define LSS_ID_old 354 // ID 254 to broadcast to every motor on bus
#define LSS_ID  0 // the new ID


// Create one LSS object
LSS myLSS = LSS(LSS_ID);

void setup()
{
  mySerial.begin(115200); // Important! this is the standard speed for talking to LSS
  mySerial.print("#0D1500\r");  // this is used to clear the serial buffer
  delay(1000);
  //change ID
  mySerial.print(String("#") + LSS_ID_old + String("CID") + LSS_ID + "\r");
  delay(2000);
}
void loop() {
}
Now you can control two motors at the same time:
#include <SoftwareSerial.h>

SoftwareSerial mySerial(8, 9);

#define LSS_ID1  1
#define LSS_ID2  0


int direction = -1;

void setup() {
  mySerial.begin(115200); // Important! this is the standard speed for talking to LSS
  mySerial.print("#0D1500\r");  // this is used to clear the serial buffer
}

void loop() {
  // motor direction
  mySerial.print(String("#") + LSS_ID + String("WR") +-direction*60) + "\r"); // RPM move
  mySerial.print(String("#") + LSS_ID + String("WR") + 60*direction  + "\r"); // RPM move
  delay(5000);
  // reverse direction
  direction = -direction;
}
Troubleshooting
A reset may sometimes be needed
#include <SoftwareSerial.h>

SoftwareSerial servoSerial(8, 9);

// ID set to default LSS ID = 0
#define LSS_ID 254 // ID 254 to broadcast to every motor on bus

void setup()
{
mySerial.begin(115200); // Important! this is the standard speed for talking to LSS
  mySerial.print("#0D1500\r");  // this is used to clear the serial buffer
  delay(1000);
  //  reset
  mySerial.print(String("#") + LSS_ID + String("DEFAULT")+"\r");
  delay(500);
  mySerial.print(String("#") + LSS_ID + String("CONFIRM")+"\r");
  delay(2000);
}
void loop() {
}
Exercise:
Build a stopwatch with the smart servo and two buttons.
The movement of servo indicates the seconds elapsed.
Clicking the first button starts and stops the stopwatch. The 2nd button resets the stopwatch.
TIP: Use the millis() function to find the elapsed time.
Possible Solution: This is one solution but it could use some improvement: It needs a denounce and a pause without delay function to avoid blocking your code. This solution uses an older arduino library that might need to be updated.
#include <LSS.h>
#include <SoftwareSerial.h>
SoftwareSerial servoSerial(8, 9);

// ID set to default LSS ID = 0
#define LSS_ID    (0)
#define LSS_BAUD  (LSS_DefaultBaud)

// Create one LSS object
LSS myLSS = LSS(LSS_ID);
int ServoPosition = 0;
bool counting = true;
int resetTime = 0;
int lastMovement;

void setup() {
  servoSerial.begin(LSS_BAUD);
  // Initialize the LSS bus
  LSS::initBus(servoSerial, LSS_BAUD);
  Serial.begin(LSS_BAUD);
  myLSS.move(0);
  // allow time to move to 0 position
  delay(3000);
  myLSS.setMaxSpeed(600, LSS_SetConfig);
  //buttons
  pinMode(11, INPUT);
  pinMode(10, INPUT);
}

void loop() {
 delay(1000);
  if (counting) {
    int seconds = (millis() - resetTime)/1000; // see below for an explanation of resetTime
    ServoPosition = seconds * 60;  // if we divide 360 by 60 we get 6.0 degrees
    myLSS.move(ServoPosition); // move servo to position
    Serial.println(seconds);
    lastMovement = millis();
  } else {
    resetTime = millis() - lastMovement; // this helps us return to the last position of the clock movement
  }
  // buttons
  if (digitalRead(10) == HIGH) {
      // stop or start
     counting = !counting;
     Serial.println("Start/Stop");
     // this could be improved on with a debounce!
  }
   if (digitalRead(11) == HIGH) {
    // reset
      Serial.println("reset");
      myLSS.move(0);
      delay(2000);
      resetTime = millis();  // we use this to restart our counter from 0
  }
}
Here is a better solution, that is non-blocking and implements debouncing with a debounce library.
#include <LSS.h>
#include <SoftwareSerial.h>
#include <ButtonDebounce.h>

#define pinStopStart 10
#define pinReset 11

SoftwareSerial servoSerial(8, 9);
ButtonDebounce buttonStartStop(pinStopStart, 250);
ButtonDebounce buttonReset(pinReset, 250);

// ID set to default LSS ID = 0
#define LSS_ID    (0)
#define LSS_BAUD  (LSS_DefaultBaud)

// Create one LSS object
LSS myLSS = LSS(LSS_ID);
//
bool timing = true;
long timer = 0;
long lastTimer = 0;
int lastTimerSecond;

void setup() {
  servoSerial.begin(LSS_BAUD);
  // Initialize the LSS bus
  LSS::initBus(servoSerial, LSS_BAUD);
  Serial.begin(LSS_BAUD);
  myLSS.move(0);
  // allow time to move to 0 position
  delay(3000);
  myLSS.setMaxSpeed(600, LSS_SetConfig);
  //buttons
  buttonStartStop.setCallback(startStop);
  buttonReset.setCallback(resetTimer);
}

void loop() {
  buttonStartStop.update();
  buttonReset.update();
  if (timing) {
    updateTimer();
    if (getTimerSeconds() > lastTimerSecond) {
      int ServoPosition = getTimerSeconds() * 60;  // if we divide 360 by 60 we get 6.0 degrees
      myLSS.move(ServoPosition); // move servo to position
      Serial.println(getTimerSeconds());
      lastTimerSecond = getTimerSeconds();
    }
  }
}

void startStop(int state) {
  // start or stop the timer
  if (state == HIGH) {
    // stop or start
    Serial.println("Start / Stop");
    timing = !timing;
    lastTimer = millis(); // record that time when we last started or stoped the timer
  }
}

void resetTimer(int state) {
  if (digitalRead(11) == HIGH) {
    Serial.println("reset");
    myLSS.move(0);
    timer = 0;  // reset Timer
    lastTimerSecond = getTimerSeconds();
  }
}

int getTimerSeconds() {
  return floor((timer) / 1000);
}

void updateTimer() {
  timer += millis() - lastTimer;
  lastTimer = millis();
}
Wifi and Lynx Smart Motion
Here is an example for connecting processing to Arduino wifi rev 2 wirelessly with shiftr.io.